New version
Recommended
XML Import is a Joomla 2.5.x/3.x component. It allows you to import data from an XML or CSV file to VirtueMart.
XPath is a major element in the XSLT standard.
XPath can be used to navigate through elements and attributes in an XML document.
XPath Syntax: See there
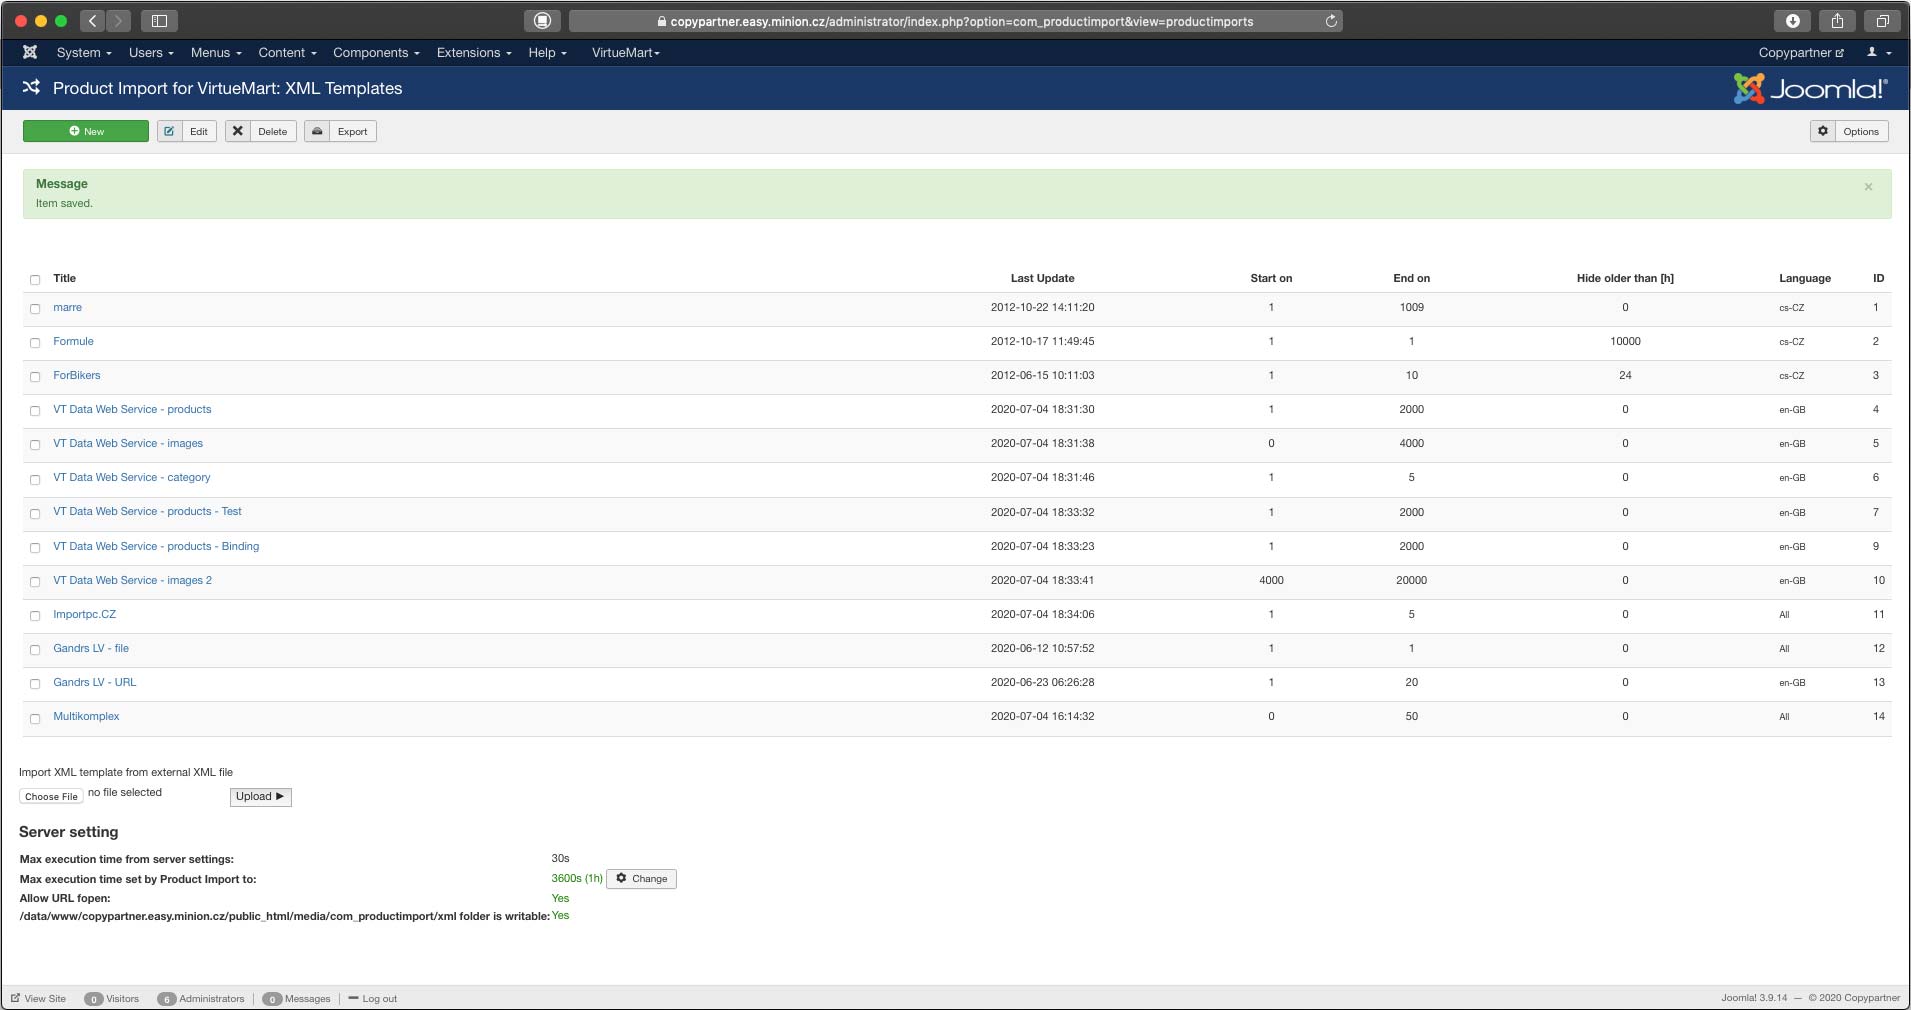
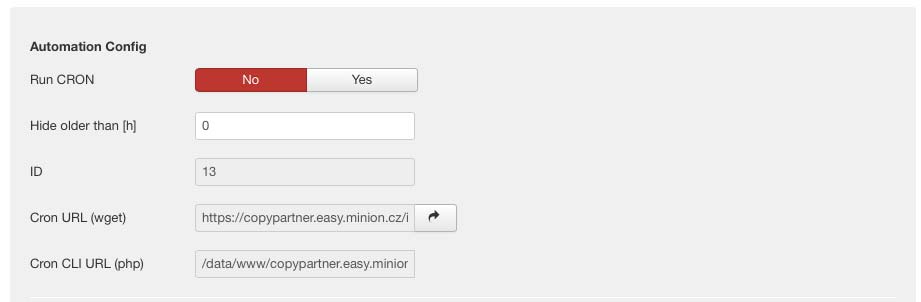
After installing the XML Import Component, you will see the list of predefined XML templates. Just go to Components > XML Import. To create a new XML template, just click the "New" icon in the upper right corner. To edit an existing XML template, click on it's title. If you do not need the other templates, you can delete them.
After clicking the "New" icon, you will see a form where you define the new template. You have to fill in: Title, URL of XML and Language. The XML URL must be provided by an existing online store from where you want to transfer the products. You can also upload an XML file. If you want to upload a CSV file, the XML Import Component will first convert it to an XML file and the work with it further. You have to set the language every time as Joomla! creates individual table for every language. Once everything is set, click the "Save" icon.
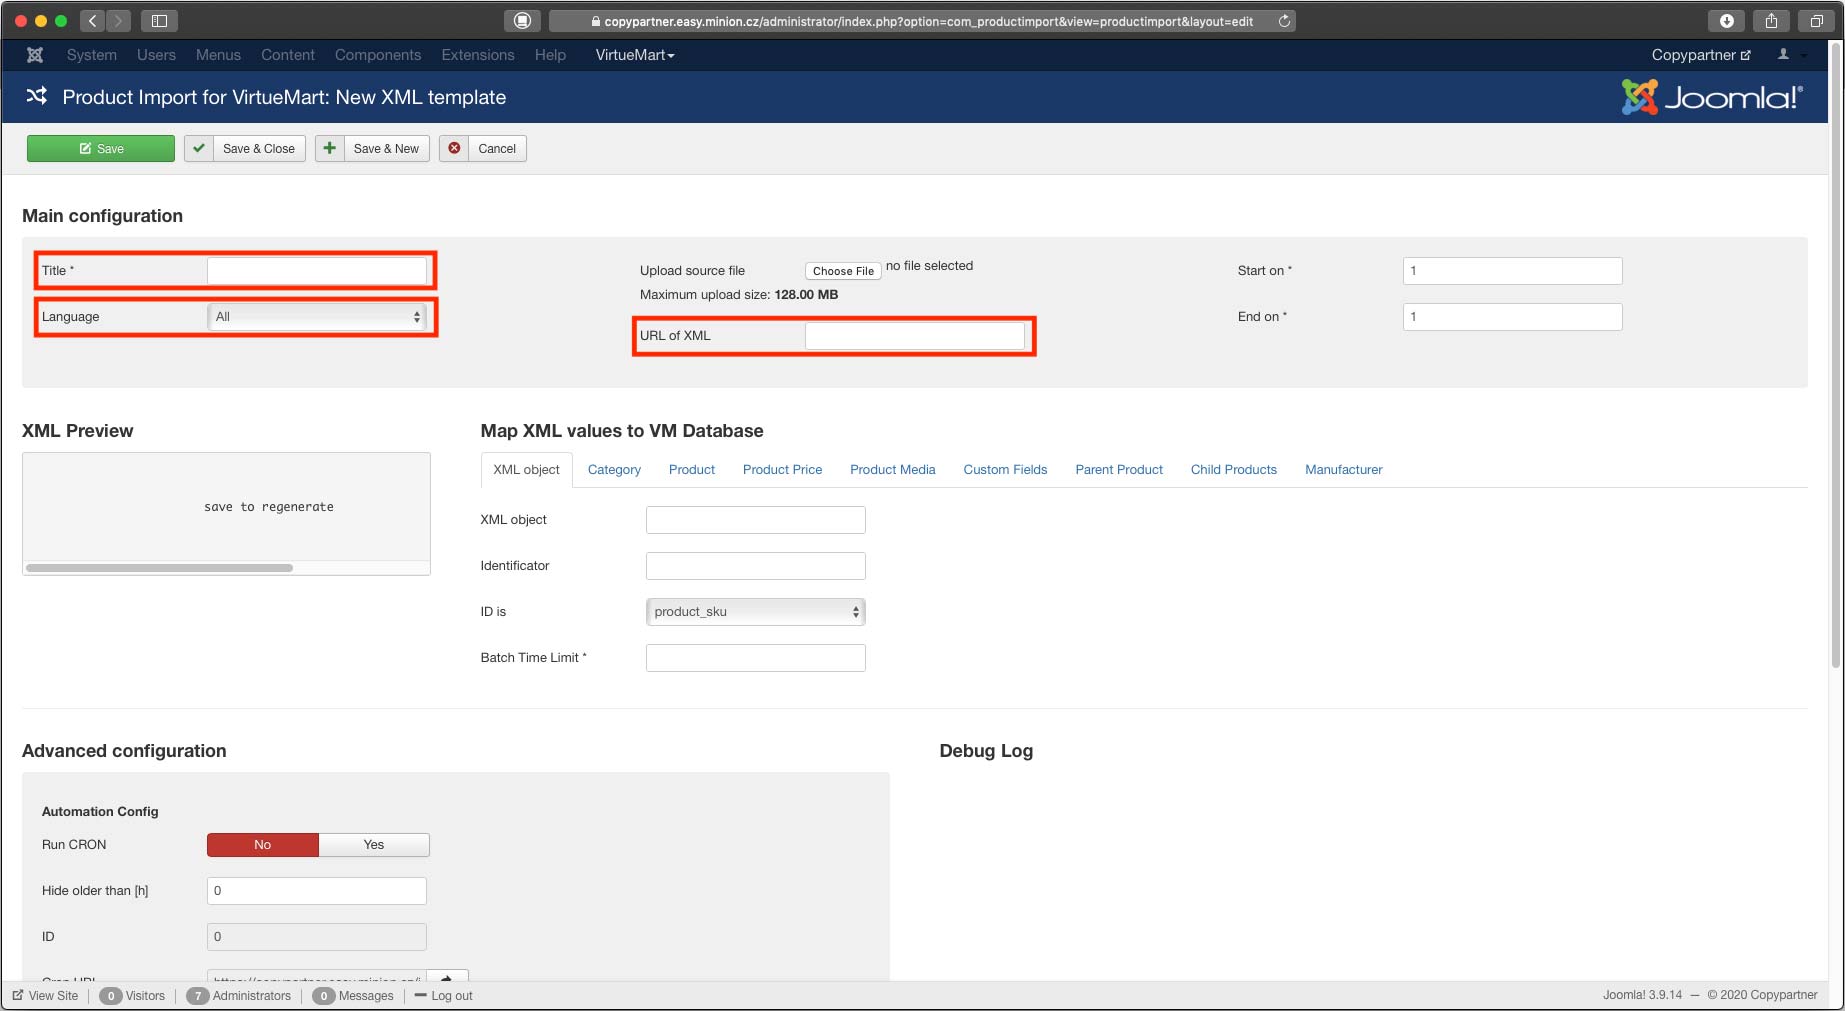
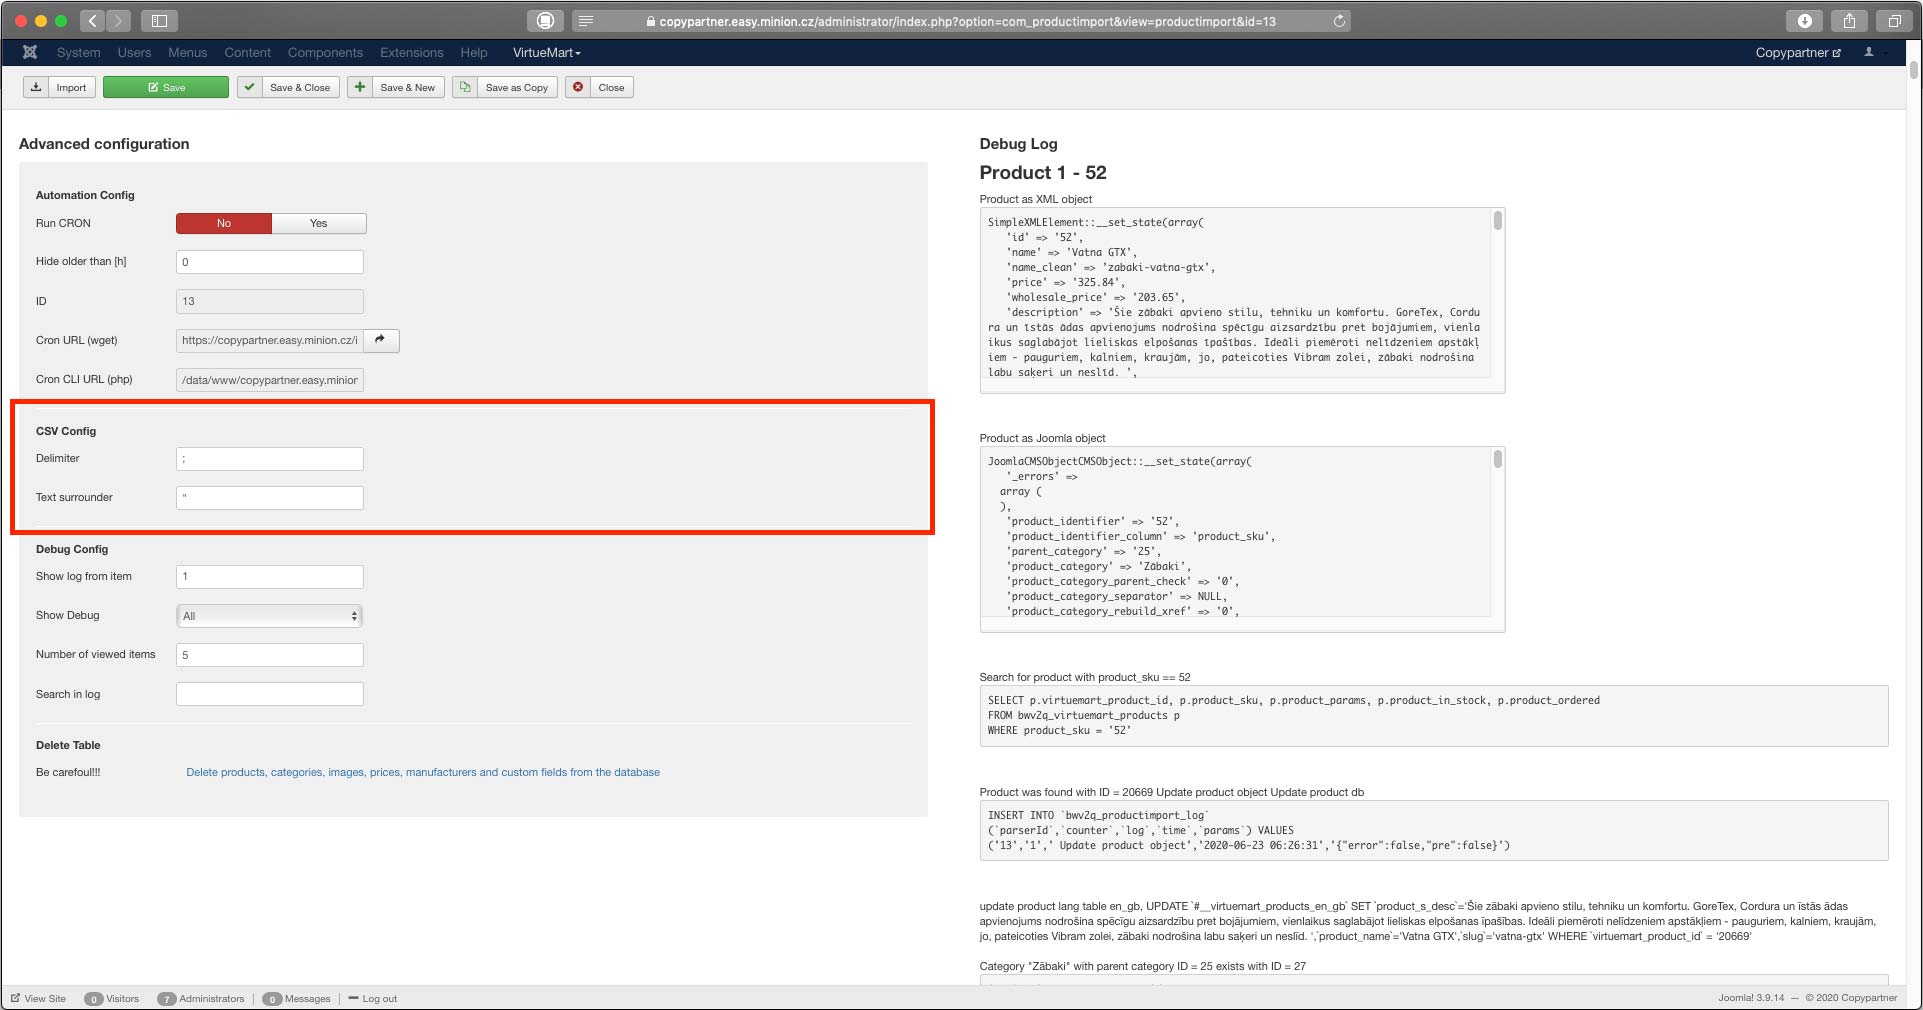
After saving the XML URL, further parameters will show up. In the XML Preview tab on the left, you will see the XML tag overview. You can copy/paste the tags into the Product tab on the right and thus map your XML to the Joomla/Virtuemart database. In the picture on the left, you can see a ready XML template. Once your tags are mapped, just set how many products you want to import by setting the "Start On" and "End On" fields in the "General Settings" and the click the "Import" icon in the upper right corner.

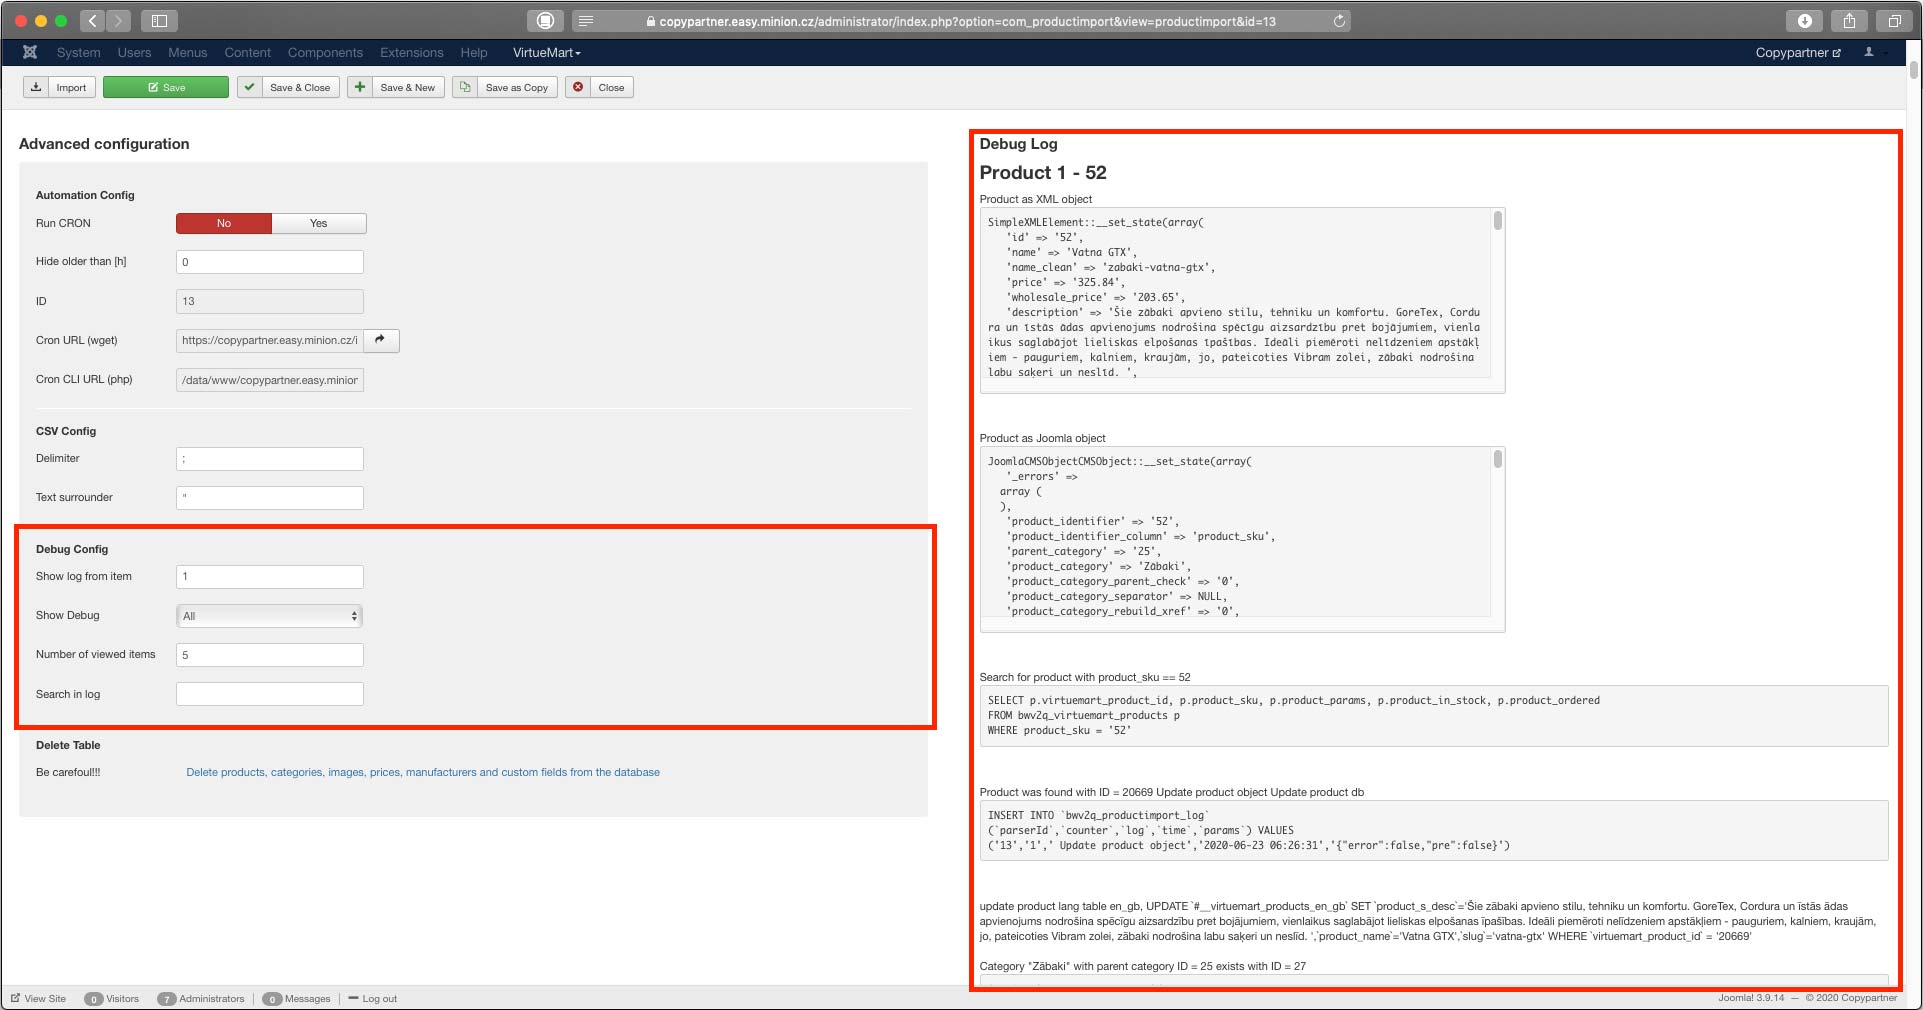
The XML Import Component logs almost all operations. If there is an error or something is not parsed correctly, you can find in in the "Debug Log". The "Debug Log" can be configured to show "Errors only" or "Nothing". It helps parse the product quicker and saves your database capacity.
The XML Import Component can operate with XML files only but it can process a CSV file as well. It converts the CSV file to XML automatically so it can parse it. You can do a CSV export in all common spreadsheet applications such as Microsoft Excel or Open Office Calc. Therefore, you can edit your products in, say, Microsoft Excel and then import them into VirtueMart.
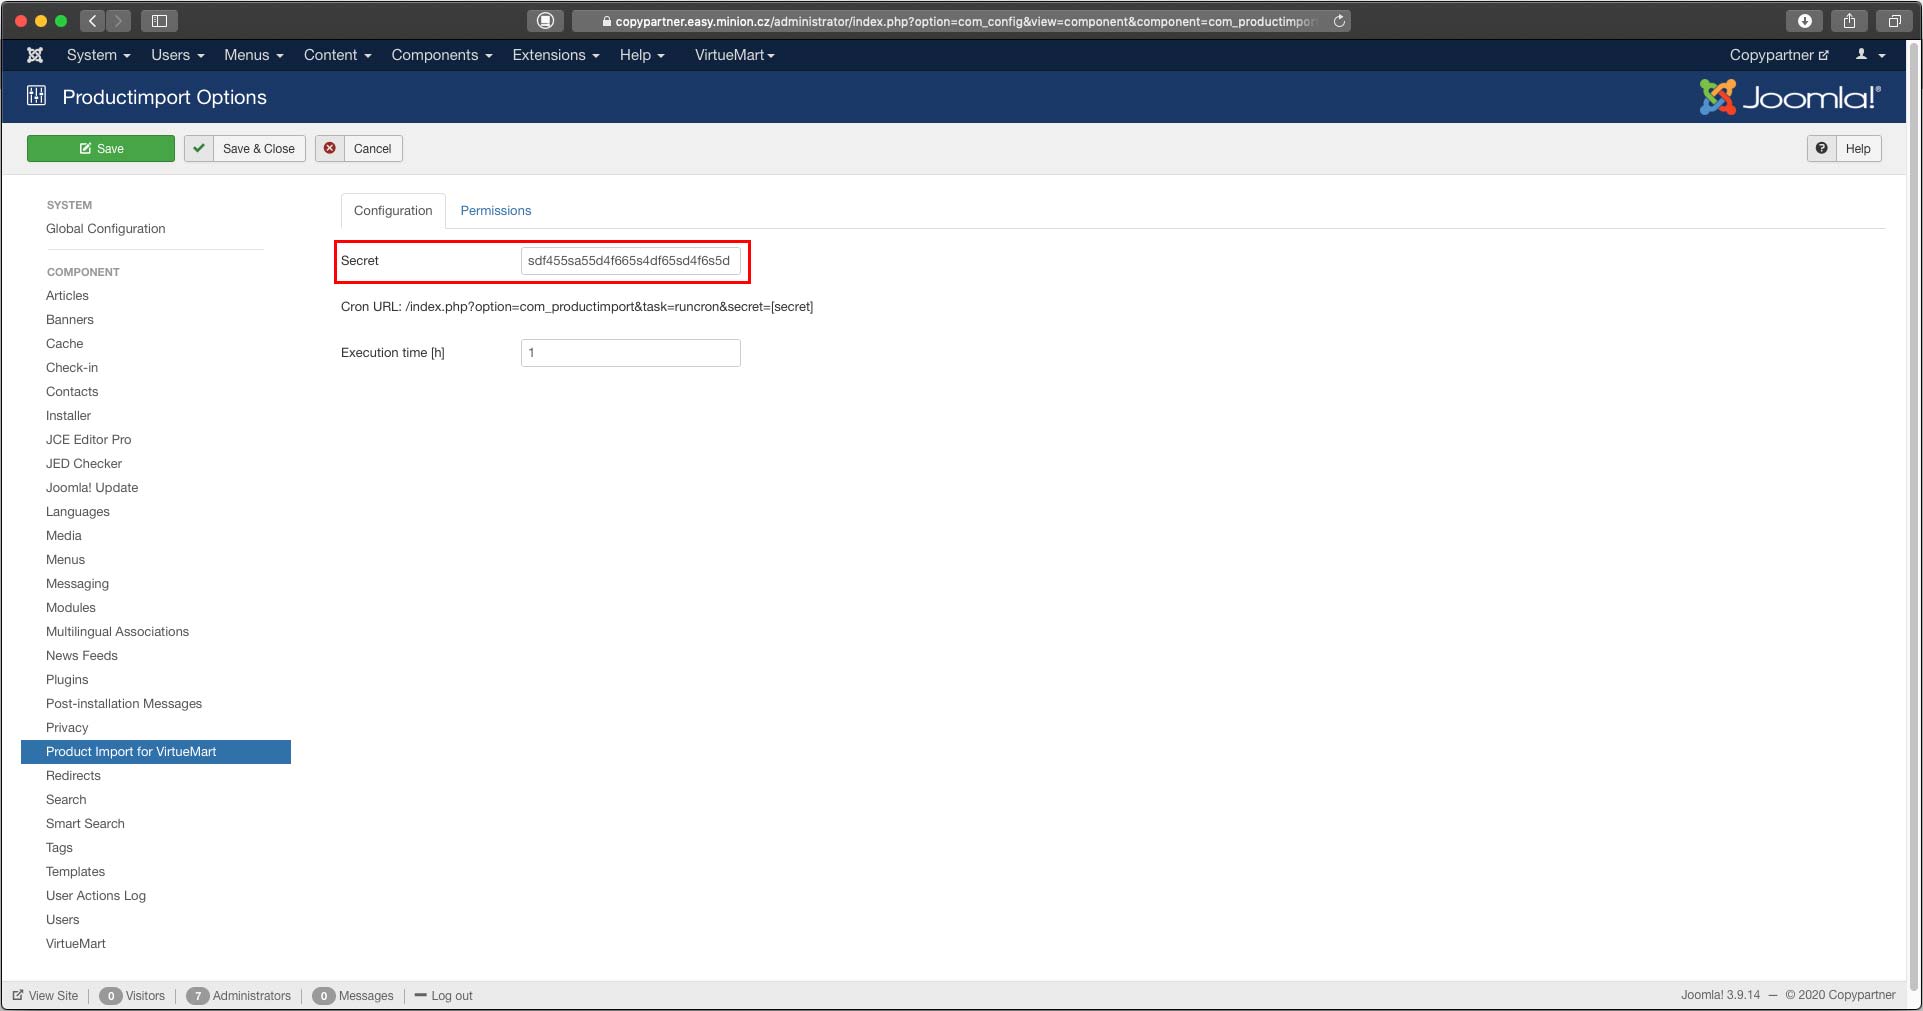
The XML can be updated by automated CRON jobs. CRON is a server feature where you enter the URL which you want to update and set the time, i.e. every day at 3pm. You can set your custom URL by adding a Secret (a custom alfa-numeric code) to prevent attacks. In the template settings you can define whether the XML should be updated from the given public address.
Since version 1.1.0, there is option to import XML template with selected ID. To do so, add to the end of import URL this parameter:
&id=[ID]
Where [ID] is number of the XML template you want to import. If you want to import more different XML templates, create multiple cron instances and insert particular template ID for every instance.
Example URLs for cron job:
Cron URL1: http://[yourdomain.com]/index.php?option=com_productimport&task=runcron&secret=[secret]&id=1
Cron URL2: http://[yourdomain.com]/index.php?option=com_productimport&task=runcron&secret=[secret]&id=2
Cron URL3: http://[yourdomain.com]/index.php?option=com_productimport&task=runcron&secret=[secret]&id=5
Secret is the same for all URLs. It is configurable from Product Import component Options.
To configure cron job, go to your hosting configuration (CPanel) and create cron job or ask your webhosting provider how to do it.
Example full Cron:
00 06 * * * wget --no-check-certificate -O /dev/null "https://copypartner.easy.minion.cz/index.php?option=com_productimport&task=runcron&secret=[pasword from administration]&id=5" &>/dev/null
Since version 1.3.0, there is option to import XML template with CLI Cron with selected ID. To do so, add to the end of import URL this parameter:
--id:[ID]
Where [ID] is number of the XML template you want to import. If you want to import more different XML templates, create multiple cron instances and insert particular template ID for every instance.
Example URLs for cron job:
Cron URL1: [server_path]/administrator/components/com_productimport/cli/import.php --id:1
Cron URL2: [server_path]/administrator/components/com_productimport/cli/import.php --id:2
Cron URL3: [server_path]/administrator/components/com_productimport/cli/import.php --id:5
To configure cron job, go to your hosting configuration (CPanel) and create cron job or ask your webhosting provider how to do it.
Example full CLI Cron:
00 05 * * * php/data/www/copypartner.easy.minion.cz/public_html/administrator/components/com_productimport/cli/import.php --id:4

Every XML template must have a title. It is recommended to set the title according to the type of imported items or source > simply to know what you are importing in the future (in case of multiple templates).
As mentioned before, you can upload an XML or CSV file or set a public URL. When uploading a file form your computer, the URL is defined automatically.
Then you have to set the start item and end item by filling in the "Start On" and "End On" fields. This is useful when testing an upload of one item. It is also possible that the parsing process will take longer and will exceed the server's maximum execution time. In this case, you can divide the XML into two parts by parsing the first half and the the second half separately.
It is necessary to select the template type, or Handler, which will parse the XML. So far, there are two handlers available: VirtueMart and Form2Content. (this option is no longer available - you use a separate application to import data into the Form2Content application).
Also, it is possible to hide old items by setting the "Hide older then [h]" option. The value is enter in hours. After parsing, the time of the last modification is changed at each item and a script un-publishes all items that are older then the value you entered. This way, you can exclude old items from the import.
When parsing VirtueMart products, it it essential to set the language because the text is stored in individual table for each language. When parsing to Form2Content, select the Language option just in case of a multilingual website.
The last option in the General Settings is setting an XML URL updated by CRON jobs.
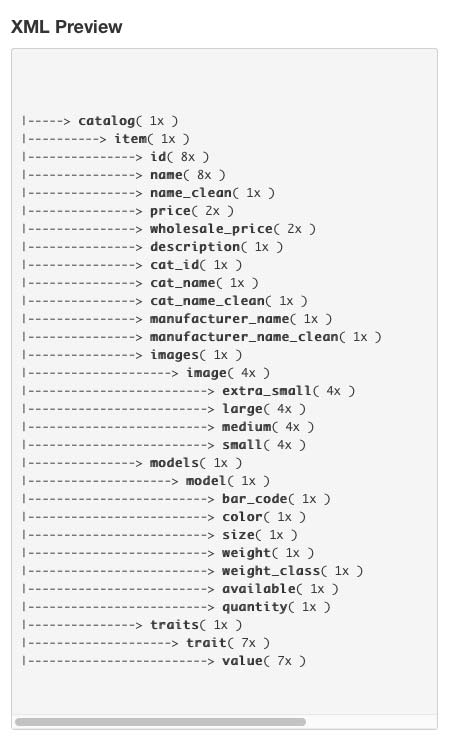
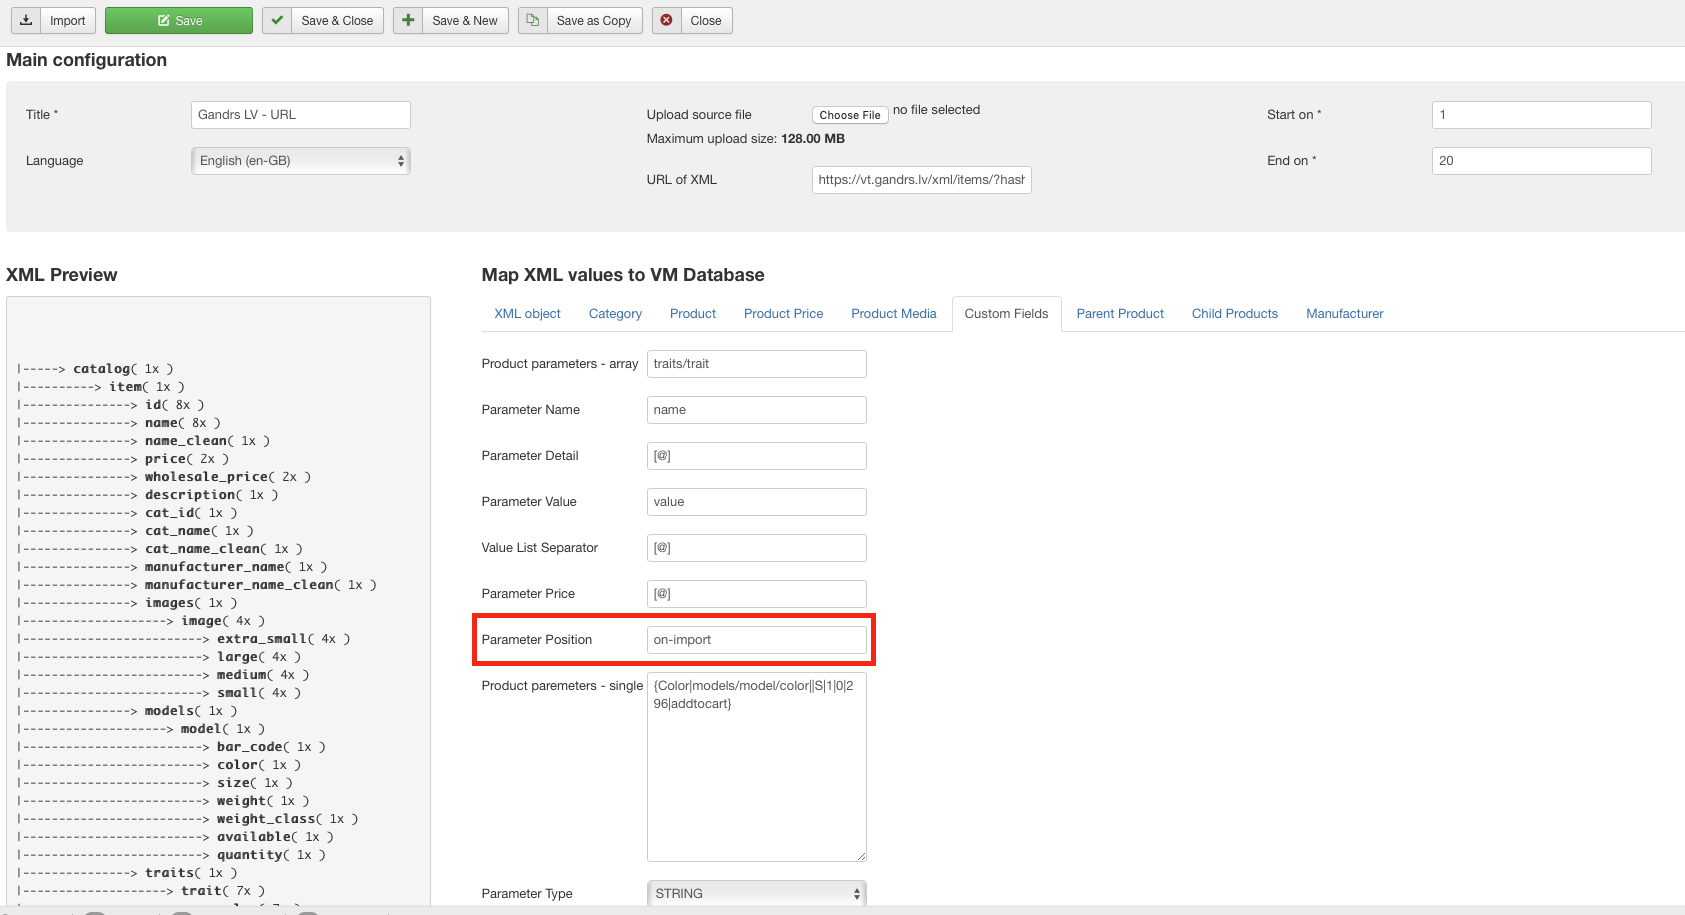
The XML Import Component will create a simple XML Overview where you can see the structure and what XML tags are used including their count. In the picture on the left you can see that there are 4 097 products in the XML.
Using this overview, you can copy/paste the tags into particular fields in the Product tab on the right. Be aware that this is just an overview and check the tags with your XML file.
The first link, as the name implies, will delete all VirtueMart tables that are used by the XML Import Component. This feature was developed mainly for testing purposes. If something goes wrong, you don't have to delete thousands of products in the VirtueMart administration – all you have to do is use the link. Watch out! The data will be removed permanently. Therefore, it is recommended to backup the database continuously.
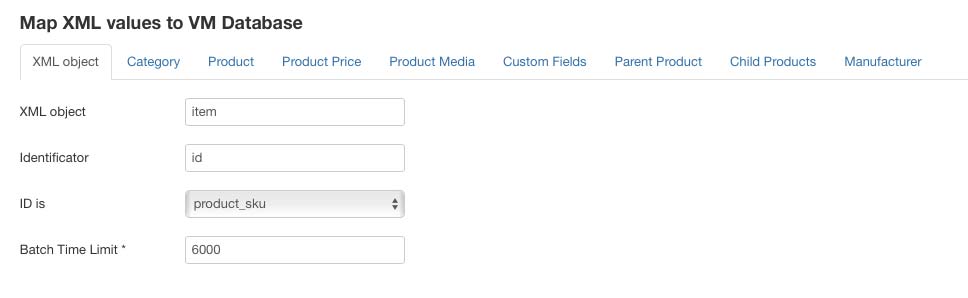
In order to process large XML files, the component does not load the file to a memory but parses it step by step instead. It parses a short section, then drops it and moves on. This section is defined by the XML object field. Enter the name of the XML item - in our case, a product.
It is very important to choose the identifier which is represented by the Identificator field. Thanks to the "ID", the component decides whether the product already exists and therefore will be updated or does not exist and will be created.
The next field "ID is" defines which column in the database is used to represent the ID. In most cases, it is the SKU (stock-keeping unit), however it is possible to enter any custom field. This way, you are able to assemble a product from various sources which do not have the same identifier.
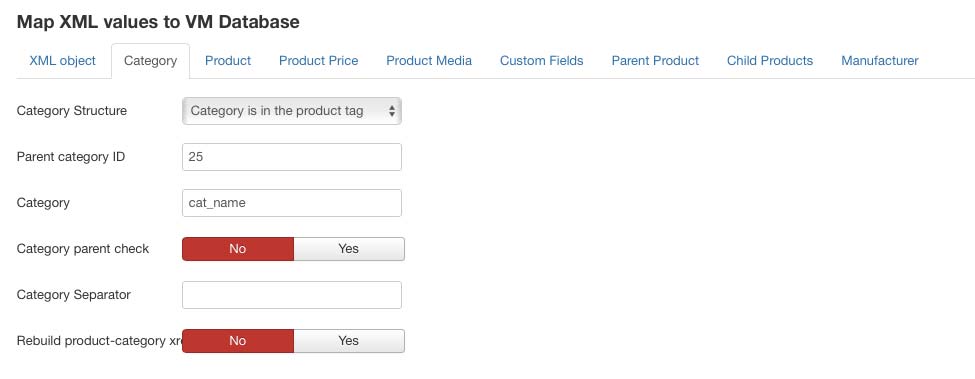
There are two ways how online stores define categories: 1) category is a tag within a product, 2) product is a tag within a category.
<products>
    <product>
        <sku>hola001</sku>
        <name>Audi A3</name>
        <category>Automobily|Audi</category>
    </product>
</products>
See that an "Audi A3" product is in the "Cars" category and the "Audi" sub-category. The XML Import Component creates these categories automatically, all you need to do is enter a separator which is used in the XML and separates the sub-categories. In this case, it is a "|" character.
<categories>
    <category>
        <category_name>Audi</category_name>
        <product>
            <sku>hola001</sku>
            <name>Audi A3</name>
        </product>
    </category>
</categories>
It is also possible to specify to which existing category should all products and sub-categories be parsed. This option is useful when you are importing from various sources – every product can have its parent category.
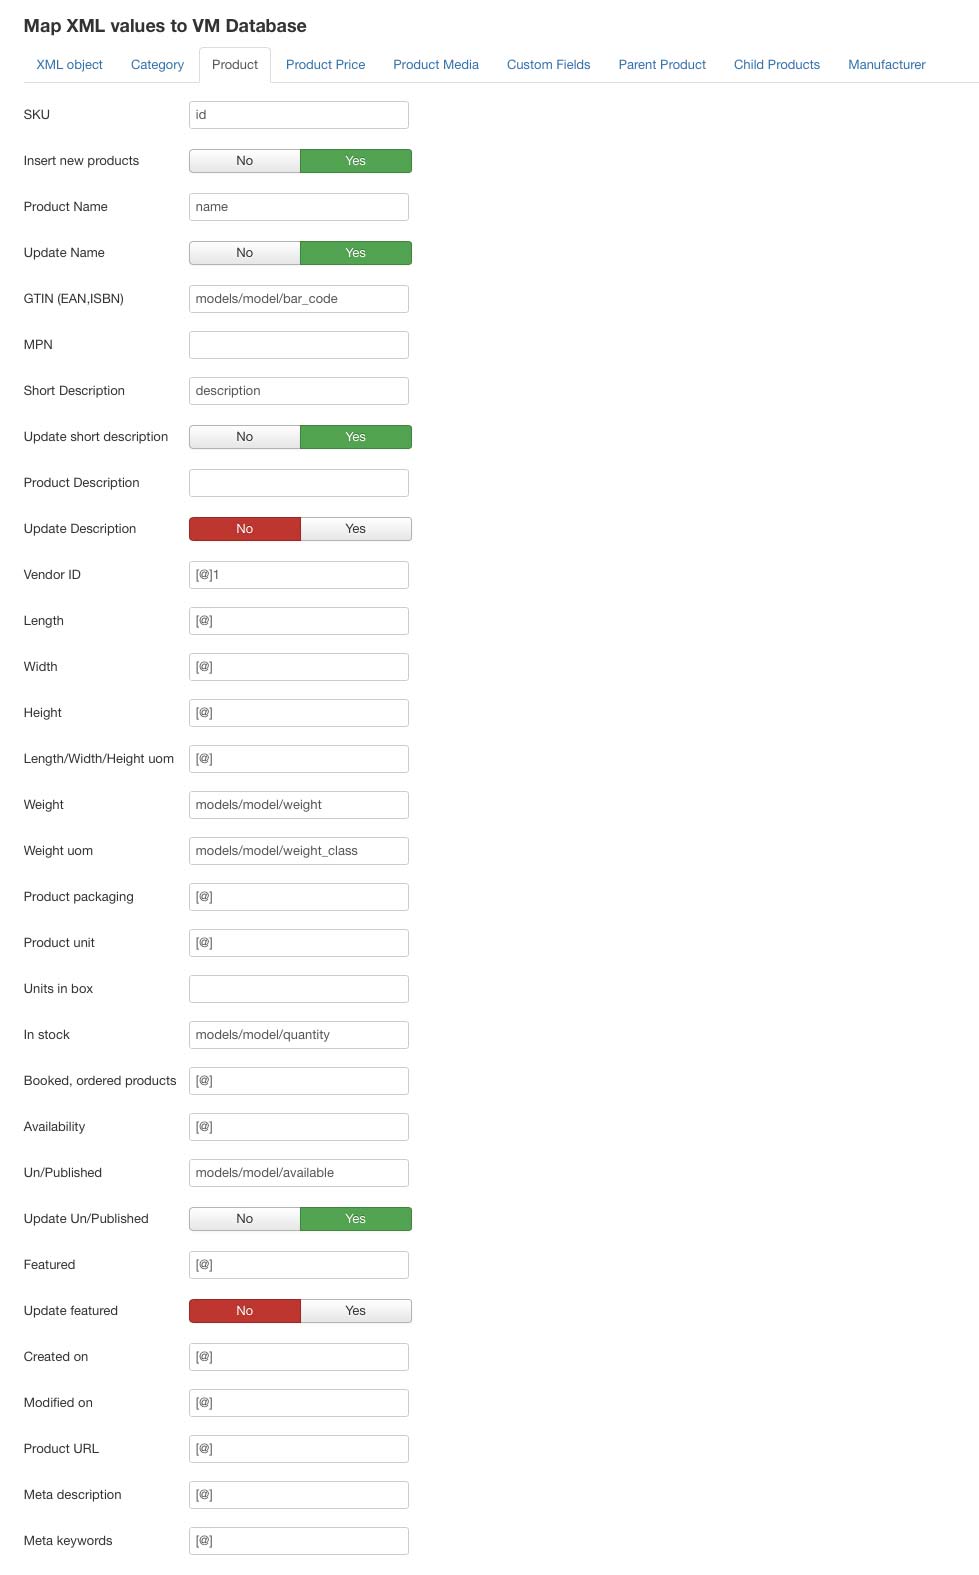
There are several fields: Product Name, Short Description, Product Description, SKU, Weight, Product URL and Product Price. There you have to enter the name of the appropriate XML tag. If the imported XML does not contain any of the fields (i.e. a short description), just leave the field empty.
There are several fields where you can choose whether the information is supposed to be updated or not. Its purpose is simple: in some cases you do not want to update all fields and you want to update/edit them in the VirtueMart administration instead.
Fields with a Specific Function:
Some XML files contain information about parent products. VirtueMart can work with such products and the XML Import Component can store them. The only question is whether to map parent product according to IDs or SKUs.
If there is information about product's stock, you can paste it to this field. It must be a number.
If there is information about the stock amount in the XML, you can put the particular XML tag here. Note, that the XML tag must contain a valid numeric value only.
If these fields are empty, the XML Import Component will set the "Created on" date according to the date of the first XML import and it will change the "Modified on" date after every update. If you want to parse this information form the XML, enter the particular XML tags. Preferably, it should be a DateTime MySQL format.
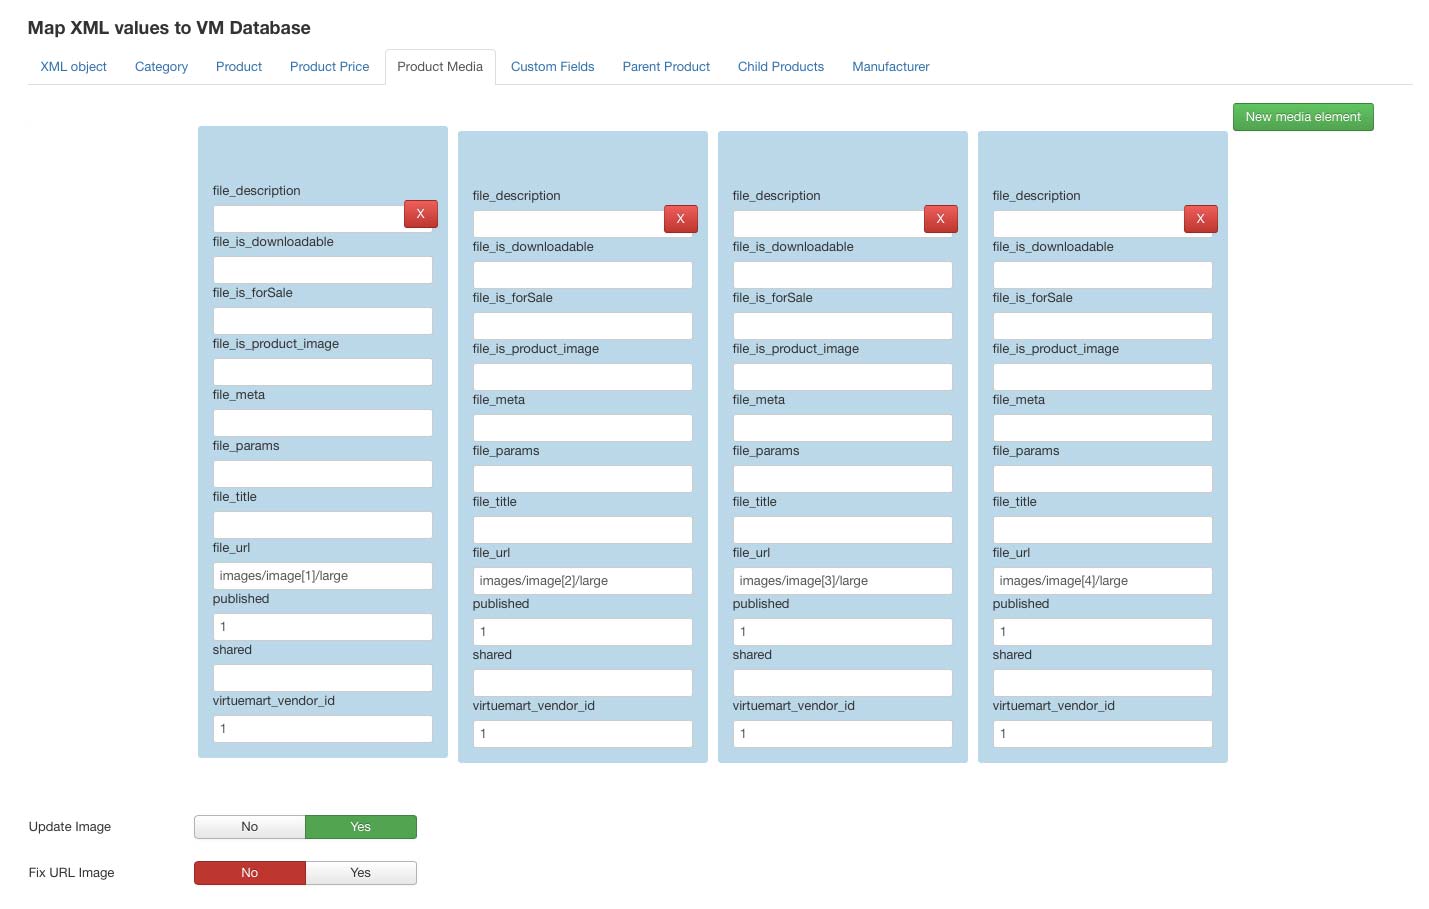
If there is a tag with an image name in the XML, enter the tag into this field. The component will download the image, save it to a particular folder and assign it to a product. The thumbnail is created by VirtueMart itself. The size of the thumbnail is therefore set directly in the VirtueMart administration.
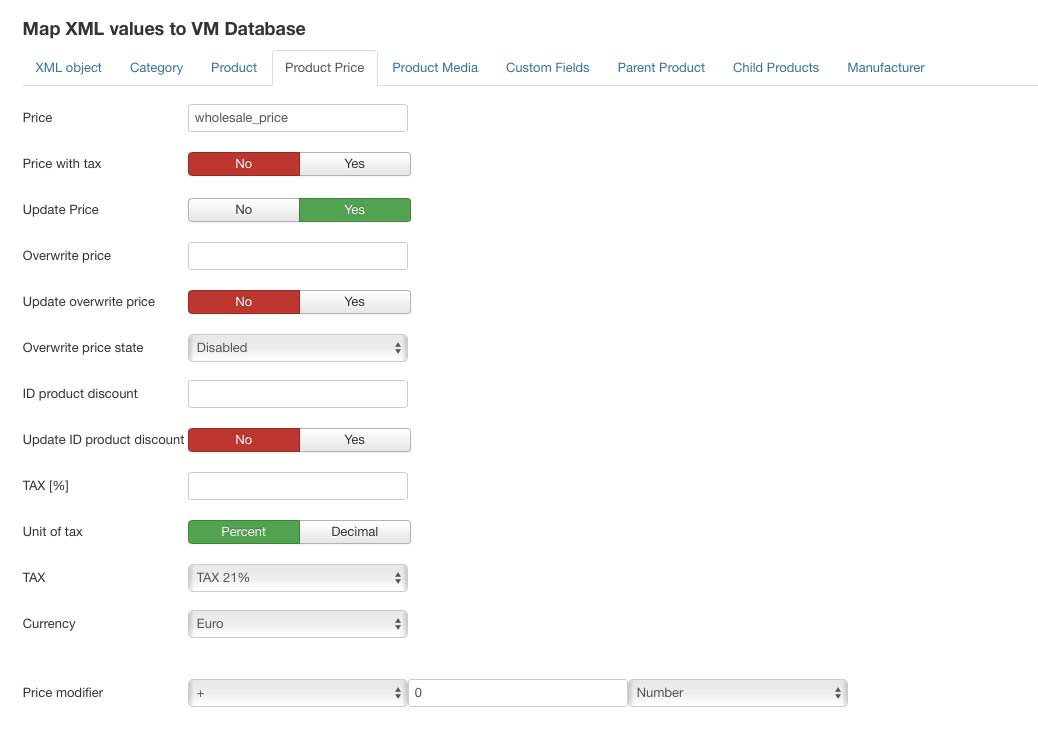
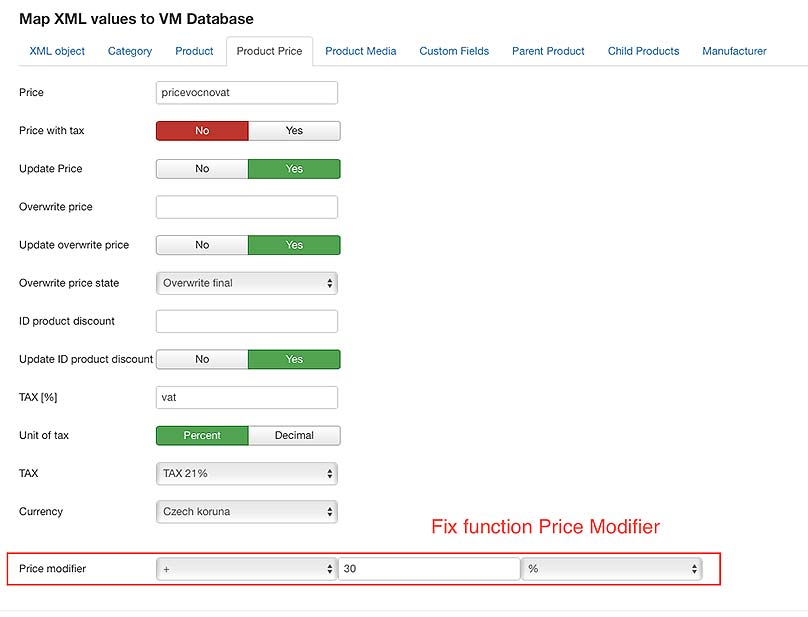
Enter the price XML tag into the "Price" field. The price must exclude VAT because VirtueMart calculates the VAT automatically.
You can choose if the price should be updated or not.
If there is a tax rate in the XML file, enter the tag into the TAX [%] field. If the tax rate you entered is already defined in VirtueMart, the products will be assigned to this existing tax rate. If the tax rate does not exist in VirtueMart, the XML Import Component will create a new one and assign the products to it.
You can also choose a default tax rate and currency. If you use the default values, all products will have VirtueMart default values.

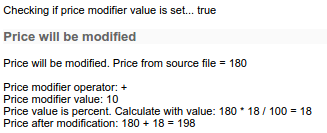
Price can be modified during import. You can select operator (+, -, /, *), value which will modify the product price and if the value is percent or just number. You can see what exactly is happening during price modification at debug log. Example of debug log output:
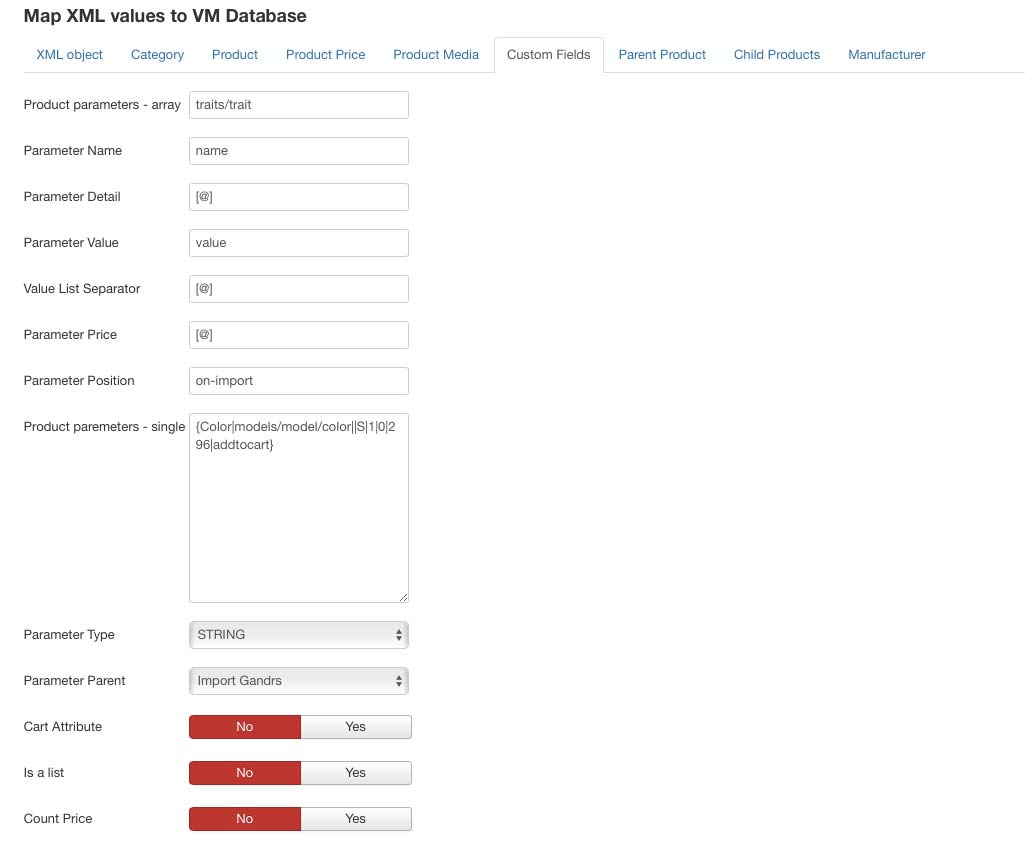
The product parameters can be imported in two ways. It depends in how they are stored in the XML file.
The first option: product custom fields are stored in the XML. Below is an example of how an array of custom fields can look like.
To give you an example of what a product custom field is, imagine you have a pair of shoes which is a product and the product custom fields are shoe sizes (9, 10, 11, etc.).
First, enter the parameter path (custom field path) into the first text field (Product parameters - array). Then enter the parameter definition in the following fields: Parameter Name, Parameter Detail, Parameter Value and Parameter Price.
The parameter (custom field) price is stored in VirtueMart as the subtraction from the product price. Example: "We have imported a XML file where the product price was empty and all the prices were given in the parameter price (custom field price)". For such cases, there is the "Count Price" checkbox which takes the lowest parameter price and sets it as the product price. Then it subtracts this value from the price of the parameters (custom fields). Example: suppose you have a pair of shoes where the shoe sizes differ in price. Size 9 is for 100 €, size 10 is for 110 € and size 11 is for 120 €. The XML import Component take the lowest price (which is 100 €) and sets it as the product price. Therefore the product costs 100 €. Then it subtracts the product price from the parameter price so the shoe size 10 costs +10€ (110 – 100). The result is +10 € which is then added to the parameter price (custom field price) and makes it 110 € again.
<products>
    <product>
        <sku>hola001</sku>
        <name>Audi A3</name>
        <variants>
            <variant>
                <variant_name>Barva</variant_name>
                <variant_desc>Barva karoserie</variant_desc>
                <variant_value>Červená</variant_value>
                <variant_price>10000</variant_price>
            </variant>
            <variant>
                <variant_name>Barva</variant_name>
                <variant_desc>Barva karoserie</variant_desc>
                <variant_value>Zelená</variant_value>
                <variant_price>20000</variant_price>
            </variant>
            <variant>
                <variant_name>Převodovka</variant_name>
                <variant_value>Automatická</variant_value>
                <variant_price>200000</variant_price>
            </variant>
        </variants>
    </product>
</products>
This method is more difficult to setup but allows you to insert any information as a product parameter (custom field), regardless on where the information is in the tag tree structure. It is best if the information is stored at the highest level in the tag tree structure. If the XML structure is more complex, we can make use of the fact that the XML Import Component uses xPath to translate the tag name.
Sample XML:
<products>
    <product>
        <sku>hola001</sku>
        <name>Audi A3</name>
        <gear>automatická</gear>
        <wheels>16",17",18"</wheels>
        <variants>
            <variant>
                <variant_name>Barva</variant_name>
                <variant_desc>Barva karoserie</variant_desc>
                <variant_value>Červená</variant_value>
                <variant_price>10000</variant_price>
            </variant>
        </variants>
    </product>
</products>
The parameters are defined with a special syntax code, for example:
{Převodovka|gear}
{variants/variant[0]/variant_name|variants/variant[0]/variant_value}
{Velikost kol|wheels|,|S|1|1|0|addtocart}
{Převodovka|gear}
This is the easiest way. We want to import a parameter which represents the gear (Automatic/Manual) from the first level of the XML object. The first value is the name of the parameter and the second is the value from the XML file.
{variants/variant[0]/variant_name|variants/variant[0]/variant_value}
There we make use of the xPath feature. We take the first element (variant[0]) from the parent element. You can also use you custom field name (variants/variant[0]/variant_name) and assign the (variants/variant[0]/variant_value) value from the same element.
{Velikost kol|wheels|,|S|1|1|0|addtocart}
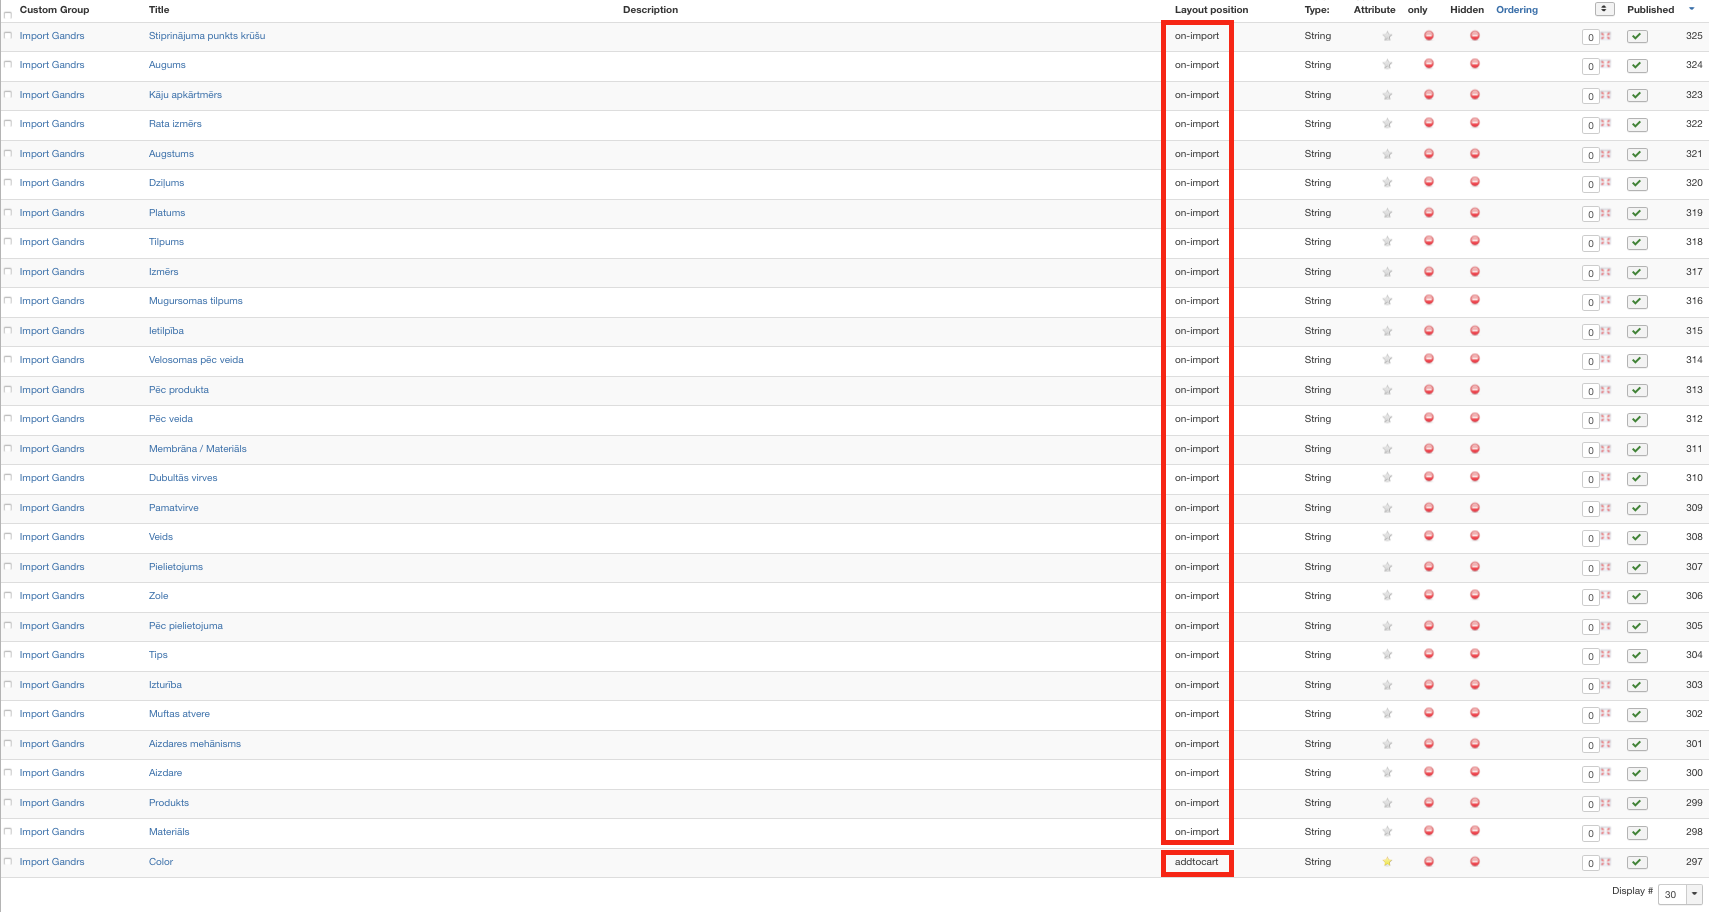
This is an extended option of the first line (Line 1). The XML Import Component will divide the value (in our case "wheels") according to the position of the comma and will assign the values to the product. Other custom fields (see the legend below) can have values 0, 1 a they define whether the field is a "cart attribute" | "list" | "parent custom field" | "layout position". The "cart attribute" | "list" | "parent custom field" | "layout position" options can be set in the VirtueMart administration at each custom field.
S ... STRING
B ... BOOLEN
D ... DATE
T ... TIME
Y ... TEXTAREA
X ... EDITOR
M ... MEDIA
G ... GROUP
C ... MULTI_VARIANT
A ... GENERIC_CHILD_VARIANT
R ... RELATED_PRODUCTS
Z ... RELATED_CATEGORIES
E ... PLUGIN
Component can work with these special symbols:
[@]http://www.some-domain.com/images/[+]pictureName
Sometimes at XML file there is only name of the image, not the whole URL. So at XML can be image defined like this:
some-image.jpg
XML import component needs to download the image so it needs whole URL. Not just a name. So we put a URL before the image name as a constant and then we merge this constant with a variable using [+] symbol.
Component then translate example as this:
http://www.some-domain.com/images/some-image.jpg
1.2.19 - 15.01.2020 - ADD - possibility to import data from URL protected by name and password or hash
Sometimes the import data is protected by name and password or by hash in the URL.
Then it is necessary to use support files when importing, which will first import the data source from the remote source to the local presentation server.
1.3.0 - 17.01.2020 - ADD - Add CLI cron
CLI cron does not load the presentation like standard cron with wget - it is possible to import tens of thousands of products at once in one instance.
1.3.1 - 18.01.2020 - FIX
1.3.2 - 20.01.2020 - FIX
1.3.3 - 20.01.2020 - ADD - Add new customfiled types for VM3 to the import settings
1.3.4 - 25.01.2020 - FIX
1.3.5 - 26.01.2020 - FIX
1.3.6 - 26.01.2020 - FIX
1.3.7 - 12.02.2020 - FIX
1.3.8 - 21.06.2020 - ADD - Add customfield layout position settings to the import
Custom fields that are not defined by a specific definition (Product parameters - single) are imported into a predefined position. This allows you to automatically display the imported customfields in the custom tab using the override template (we do not know which customfields will eventually be imported and after each import to manually define the position of each customfield is not realistic). Customfields, which are defined using the Product parameters - single definition, already have this property in the settings by default.
1.3.9 - 30.06.2020 - ADD - Import of product price with VAT (MOC)
If the import file contains the price of the product with VAT (the classic example is the import of a source - XML feed for Google), it is possible to set whether the price will be automatically deducted when importing according to the import settings to the price without VAT. By default, VirtueMart adds VAT to the price of the product according to the settings of the e-shop, so there would be double taxation. However, it is still true that the right source contains the price of the product without VAT.

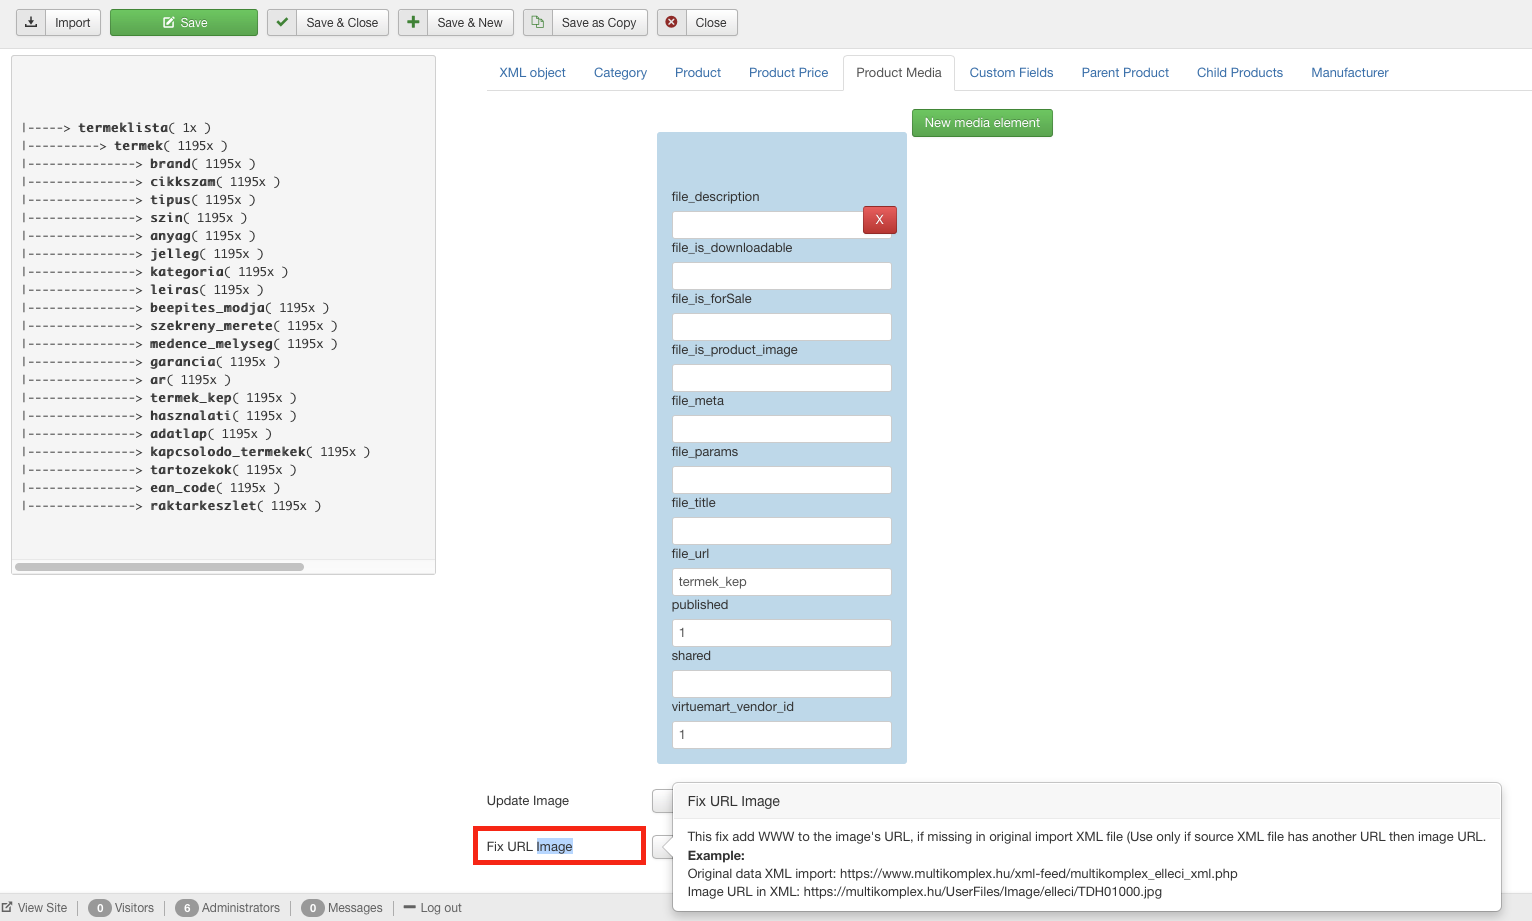
1.3.10 - 04.07.2020 - ADD - Fix image URLs
This fix is not standard functionality, but fixes an XML import source bug. Sometimes the source is at a URL with a WWW, but the images have the original URL without the WWW. When importing images, a 301 redirect occurs, which causes the images not to be imported. The source owner should properly correct such an error (for example, Google marks such a feed or products with such an error as unwanted and it is up to the owner to correct the source), but sometimes it is not possible to correct this error. Therefore, we have added a Fix on customer's request, which can eliminate this error.
1.3.11 - 04.07.2020 - ADD - Change Radio Select in setup to Buttons group
1.3.12 - 13.07.2020 - ADD - Extension Import Related Customfiled by the definition of the matching character (ID/SKU)
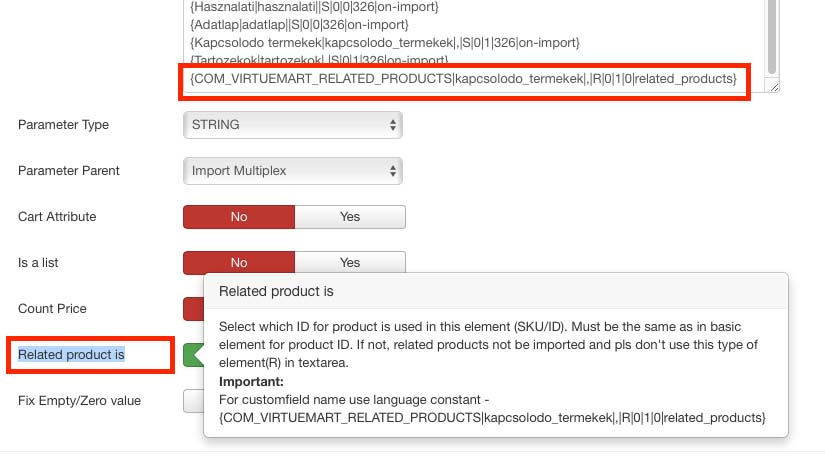
1.3.13 - 13.07.2020 - ADD - Change radio buttons to buttons group for setup "Related product is"
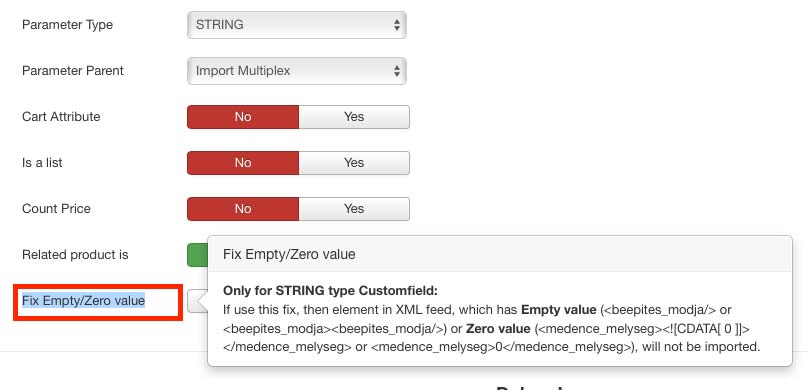
1.3.14 - 15.07.2020 - ADD - Add Fix for Empty/Zero value of STRING customfield
1.3.15 - 16.07.2020 - ADD - Add description for new functions
1.3.16 - 23.07.2020 - FIX - Fix bug in VM for empty customfield value in function saveCFValue
1.3.17 - 06.04.2021 - FIX - Fix bug in function Price Modifier - now is function! :)
1.3.17 - 06.04.2021 - FIX - Fix Import CSV file
1.3.18 - 19.04.2021 - CHANGE - Load image path from VM setup - not default from /images/stories/virtuemart/product
1.3.19 - 28.04.2021 - ADD - Import images from multipath in XML element image URL
Example:
Image path separator = "|"
https://ganjaseeds.cz/wp-content/uploads/2020/01/file_41_86-1-scaled.jpg|https://://ganjaseeds.cz/wp-content/uploads/2020/01/criticalhaze_2_mini.jpg
1.3.19 - 28.04.2021 - ADD - Import categories from multipath in XML element category URL
Example:
Categories path separator = ","
Category separator = ">"
Typ kvetení>Fotoperioda,Typy odrůd>Haze,Genotyp>Indica / Sativa,Pohlaví>Regulérní,Umístění>Skleník,Umístění>Uvnitř (Indoor),Umístění>Venku (Outdoor)
1.3.20 - 14.03.2022 - ADD - Mapping categories by import to shop categories
1.3.21 - 14.03.2022 - FIX - Add SQL table for Rules to instalation
1.3.22 - 30.03.2022 - ADD - Fix for error in images URL (spaces in image name)

1.3.23 - 19.04.2022 - FIX - Fix CLI cron for import
1.3.24 - 05.05.2022 - ADD - Remove blank spaces from the url of the image ( at the beginning and end )
1.3.25 - 05.05.2022 - ADD - Added log on import completion
You can try admin demo app on https://import.minijoomla.org
This is a component for importing VirtueMart products from XML feeds. The XML elements from the feed are simply mapped to existing VirtueMart fields. You can also create new fields.
When importing VirtueMart products, it automatically creates categories, or you can manually set the category to which the products will be imported.
You can import VirtueMart products from multiple sources. Every XML source is then saved as a template and the fields are mapped individually.
Product Import version 1.3.25
Subscription 6 months
Total amount of downloads 12
Custom support - programmer hours
The plugin inserts Google Tag Manager script into your site. GA4 supported!!!
Google E-commerce order tracking and order status changes for VirtueMart. Supports GA4!!! Connection to Targito, CJ Affiliate, Trusted Shops...
Custom support - programmer hours
 Custom support
 Google Tag Manager - J3
 Google Tag Manager for VirtueMart - J3